
What is the OpenStack CLI?
OpenStack provides a common command-line interface to OpenStack APIs. It is generally equivalent to the CLIs provided by the OpenStack project client libraries, but with a distinct and consistent command structure.
What can I do with OpenStack CLI?
tl;dr answer
Everything that can be accomplished with OpenStack Web GUI can be done with OpenStack CLI. Given the appropriate permissions, command line offers even more functionality.
But how?
In order to use OpenStack command line, user has to be authenticated and assigned with the appropriate permissions. Whether supplied as environment variables or as options on the command line, credential information options are required.
Authentication with Application Credentials
For the rest of the topic we will assume that user has created valid Application Credentials and has saved them as openstack-credentials.sh.
Launching a Virtual Machine
One of the many capabilities of OpenStack CLI is the option to create instances. Let’s see how.
Preparation
First of all, user has to install OpenStack client. The following URL provides information for famous Linux distributions: https://docs.openstack.org/install-guide/environment-packages.html.
Assuming that user is running on Ubuntu, OpenStack client can be installed by snap:
sudo snap install openstackclients --classic
And Application Credentials can be used with this command:
source openstack-credentials.sh
Finally, to test command line and credentials, user can request a list with all the projects he belongs to:
openstack project list
The expected output is similar to the bellow:
+--------------------------------------+--------------+
| ID                                   | Name         |
+--------------------------------------+--------------+
| 604859fc-9467-11ea-a9ef-0fb2470f040f | my_project   |
+--------------------------------------+--------------+
Adding an Image
in OpenStack user can create Virtual Machines from other Virtual Machines, volumes or even images. In this post we will demonstrate how to launch a Virtual Machine from an image.
User can upload an Ubuntu 20.04 cloud image to OpenStack by running the following commands:
wget https://cloud-images.ubuntu.com/focal/current/focal-server-cloudimg-amd64-disk-kvm.img
# It can take a while
openstack image create my_image \
    --file focal-server-cloudimg-amd64-disk-kvm.img \
    --disk-format qcow2
To ensure that image has been uploaded user can run:
openstack image show my_image --human-readable
The expected output is similar to the bellow:
+------------------+-----------------------------------------------------------+
| Field            | Value                                                     |
+------------------+-----------------------------------------------------------+
| checksum         | 56644ad7915ac5755eaba5633f1e5be8                          |
| container_format | bare                                                      |
| created_at       | 2020-05-13T07:48:53Z                                      |
| disk_format      | qcow2                                                     |
| file             | /v2/images/34650f09-bf2a-41d9-b47b-24d8147879c0/file      |
| id               | 34650f09-bf2a-41d9-b47b-24d8147879c0                      |
| min_disk         | 0                                                         |
| min_ram          | 0                                                         |
| name             | my_image                                                  |
| owner            | 8b16025f03334033ba6d673a1c2e78b3                          |
| protected        | False                                                     |
| schema           | /v2/schemas/image                                         |
| size             | 513.1M                                                    |
| status           | active                                                    |
| tags             |                                                           |
| updated_at       | 2020-05-13T07:53:40Z                                      |
| virtual_size     | None                                                      |
| visibility       | shared                                                    |
+------------------+-----------------------------------------------------------+
Creating a flavor
In OpenStack terminology, Virtual Machines are created based on flavors. A flavor is the hardware description of the Virtual Machine and contains information regarding CPU, RAM and Disk. Each Virtual Machine is created according to its flavor.
The following command will create a flavor with two CPU cores, 2048MB of RAM and 20GB disk size:
openstack flavor create --vcpus 2 --ram 2048 --disk 20 my_flavor
To ensure that flavor is created user can run:
openstack flavor list
The expected output is similar to the bellow:
+--------------------------------------+--------------+--------+-------+-----------+-------+-----------+
| ID                                   | Name         |    RAM |  Disk | Ephemeral | VCPUs | Is Public |
+--------------------------------------+--------------+--------+-------+-----------+-------+-----------+
| 709acd30-9467-11ea-b6ee-ab7467b54910 | my_flavor    |   2048 |    20 |         0 |     2 | True      |
+--------------------------------------+--------------+--------+-------+-----------+-------+-----------+
Adding an SSH Key
To be able to connect to a deployed Virtual Machine, OpenStack can inject the public SSH key of the user to the Operating System of the Virtual Machine. This is done by keypairs.
The following command creates a SSH key and then adds the uses the public part for a new keypair, named my_key:
ssh-keygen -q -N ""
openstack keypair create --public-key ~/.ssh/id_rsa.pub my_key
To ensure that keypair is created user can run:
openstack keypair list
The expected output is similar to the bellow:
+---------------------+-------------------------------------------------+
| Name                | Fingerprint                                     |
+---------------------+-------------------------------------------------+
| my_key              | e1:a7:d6:11:dd:47:e8:c6:10:aa:ce:51:4c:55:14:27 |
+---------------------+-------------------------------------------------+
Handle network traffic with Security Groups
A security group is a named collection of network access rules that are use to limit the types of traffic that have access to Virtual Machines. By associating a security group with a Virtual Machine, all Virtual Machine traffic is filtered by the network rules contained in it.
Since the default behavior is to deny all incoming traffic let’s allow ICMP and SSH for the Virtual Machine we are going to create:
openstack security group create my_group
openstack security group rule create --proto icmp my_group
openstack security group rule create --proto tcp --dst-port 22 my_group
To ensure that security group is created and contains the ICMP and SSH rules user can run:
openstack security group show my_group
The expected output is similar to the bellow:
+-----------------+-------------------------------------------------------------------------------------------------------------------------------+
| Field           | Value                                                                                                                         |
+-----------------+-------------------------------------------------------------------------------------------------------------------------------+
| created_at      | 2020-05-13T06:54:28Z                                                                                                          |
| description     | my_group                                                                                                                      |
| id              | 60e0fbcf-c192-4f7a-ac01-0344112f37e3                                                                                          |
| name            | my_group                                                                                                                      |
| project_id      | 8b16025f0493896aba61183a1c2e78b3                                                                                              |
| revision_number | 3                                                                                                                             |
| rules           | direction='ingress', ethertype='IPv4', protocol='icmp', remote_ip_prefix='0.0.0.0/0'                                          |
|                 | direction='egress', ethertype='IPv4'                                                                                          |
|                 | direction='egress', ethertype='IPv6'                                                                                          |
|                 | direction='ingress', ethertype='IPv4', port_range_max='22', port_range_min='22', protocol='tcp', remote_ip_prefix='0.0.0.0/0' |
| updated_at      | 2020-05-13T06:54:48Z                                                                                                          |
+-----------------+-------------------------------------------------------------------------------------------------------------------------------+
Creating a Private Network
In OpenStack each Virtual Machine must have at least one assigned network. The equivalent is at least one virtual interface connected to a virtual network. Network abstraction can be implemented in many ways but it is not a user’s concern.
In this step we will create a network, add a subnet of addresses to it and a virtual router to enable traffic flow from this network to the internet. The last component (router) assumes that an external network is already in place and provided to the user by the administrator. In different setups this could differ but not in our case. As you can imagine, external network is an OpenStack abstraction for the internet, or an actual network which is connected with the outer world.
User can create the networking components with the following commands:
openstack network create my_net
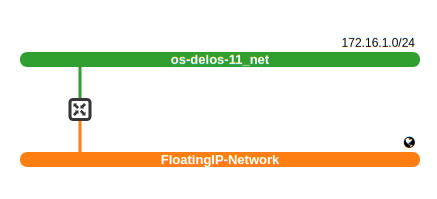
openstack subnet create --network my_net --subnet-range 172.16.1.0/24 my_subnet
openstack router create my_router
openstack router add subnet my_router my_subnet
# Bring all external networks, show only column name and print only values
# We assume that there is only one external network, eg. 'FloatingIP-Network'.
external_network=$(openstack network list --external -c Name -f value)
openstack router set --external-gateway ${external_network} my_router
The outcome of the above commands is similar to the above image which is the OpenStack GUI representation available at Project -> Network -> Network Topology:
Wrapping them all together - Spawning a Virtual Machine
With everything being configured appropriately we are finally ready to spawn a brand new Virtual Machine.
This can be done with the following command:
openstack server create \
    --image my_image \
    --flavor my_flavor \
    --key-name my_key \
    --network my_net \
    --security-group my_group \
    my_vm
To ensure that Virtual Machine is successfully created user can run:
openstack server list --image my_image
The expected output is similar to the bellow:
+--------------------------------------+-------+--------+--------------------+----------+-----------+
| ID                                   | Name  | Status | Networks           | Image    | Flavor    |
+--------------------------------------+-------+--------+--------------------+----------+-----------+
| b45dd6a1-e44e-4f02-9083-27170b2b5be4 | my_vm | ACTIVE | my_net=192.0.2.219 | my_image | my_flavor |
+--------------------------------------+-------+--------+--------------------+----------+-----------+
Final Step - Connect to Virtual Machine with SSH
As a final step we will demonstrate how to remotely connect to the brand new Virtual Machine we created with SSH. To be able to to communicate with the Virtual Machine, we have to assign a public IP to it. This can be done with the help of a Floating IP. Understanding he mechanism of Floating IPs is out of scope of this post, but we can assume that a Floating IP is 1:1 translation of a private IP to a public IP. This translation happens with the help of the router we create in the previous step.
To be able to connect to the Virtual Machine user has to run the following commands:
# Bring all external networks, show only column name and print only values
# We assume that there is only one external network, eg. 'FloatingIP-Network'.
external_network=$(openstack network list --external -c Name -f value)
openstack floating ip create ${external_network}
floating_ip=$(openstack floating ip list -f value -c 'Floating IP Address')
openstack server add floating ip my_vm ${floating_ip}
To test connectivity with the public Floating IP (eg. 62.217.83.60) user can run either ping or ssh with the default ubuntu user:
Ping success
$ ping 62.217.83.60 -c 4
PING 62.217.83.60 (62.217.83.60) 56(84) bytes of data.
64 bytes from 62.217.83.60: icmp_seq=1 ttl=58 time=19.4 ms
64 bytes from 62.217.83.60: icmp_seq=2 ttl=58 time=17.1 ms
64 bytes from 62.217.83.60: icmp_seq=3 ttl=58 time=18.9 ms
64 bytes from 62.217.83.60: icmp_seq=4 ttl=58 time=20.9 ms

--- 62.217.83.60 ping statistics ---
4 packets transmitted, 4 received, 0% packet loss, time 3004ms
rtt min/avg/max/mdev = 17.151/19.147/20.995/1.378 ms
SSH success
$ ssh ubuntu@62.217.83.60
The authenticity of host '62.217.83.60 (62.217.83.60)' can't be established.
ECDSA key fingerprint is SHA256:3bgcaWjOlLSinobuO05GojRpaXC2vwJi2x1vKjfca6E.
Are you sure you want to continue connecting (yes/no)? yes
Warning: Permanently added '62.217.83.60' (ECDSA) to the list of known hosts.
Welcome to Ubuntu 20.04 LTS (GNU/Linux 5.4.0-1009-kvm x86_64)
.....
ubuntu@my-vm:~$